Katana Sword Techniques
By Beth Bartlett, eHow Contributor
The creation and use of the katana are centuries-old.
The katana is one of the most unique and revered swords in history. It is part of a craftsman's tradition that borders on religion. The unique way that the katana is made gives it amazing properties and leads to a very unique set of techniques for its use. To understand it fully you have to look back at the long history of its use.
The Katana's Beginning
During the later part of the Heian period when the Fujiwara ruled Japan, there was much progress in the manufacture of the sword. The previously primitive, straight untempered sword evolved into a multi-layered refined work of art with a gentle curve. This sword and its techniques were developed in life and death struggles for rule of various parts of the country. The core of the sword was flexible and tough, while the edge was more hard and brittle and made of two different grades of metal.
Use of the Curve
While the katana was used to stab occasionally, the main use was a long sweeping slash with both arms almost fully extended. This, along with the curve of the blade, meant that unlike the chop of an axe or a straight sword, every cut was a long sawing slash. This cut was normally used in a downward motion against the neck joint or shoulder of the foe. This was one of the possible weak spots on Japanese armor.
Unlike European fencing of the same era, the swords were mainly an offensive weapon. If you were to block edge against edge with a katana, you would be striking with the most brittle part and likely you would damage the blade. Some schools taught that there was no need to block as long as you focused on being faster than your opponent. They taught the swordsman to ignore the incoming attack or sidestep it and focus on his own attack to kill the enemy. Far more common was the use of the sides and back of the sword to swat away incoming attacks. A quick sideways twist of the wrist could slap an attack away and put you in a position to strike your opponent.
The Fast Draw
The modern art of Iaido came from the continual focus on speed. The idea was to be able to draw the sword and cut down the enemy in the same single motion. There were many ways to wear the sword in the belt to facilitate different draws of the blade. In Iaido the blade is often facing up so that the drawn sword is already on a path from the sky down onto the head or neck of the opponent. The left hand holds the sheath and the right hand draws the blade and cuts. In this way the left hand could turn the blade to also face either sideways or down before the draw. This made it possible to draw and cut in any direction.
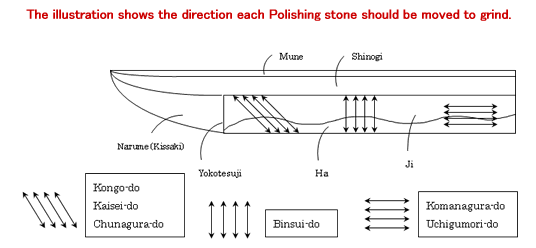
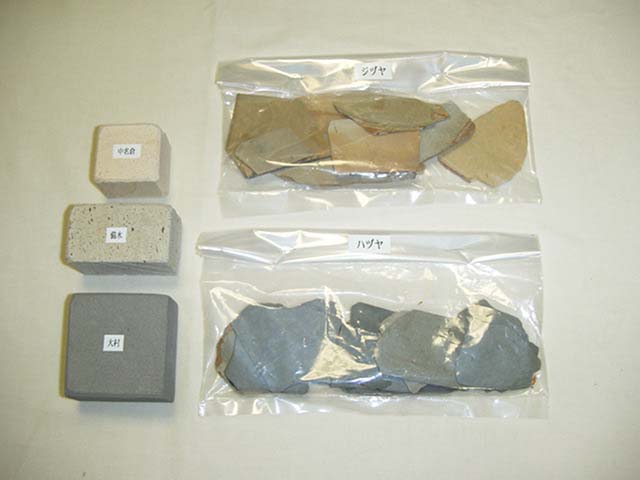
How to use The right order to use polishing stones and finishing tools. 1: 1) First, choose polishing stones according to your sword to grind and polish. #1, Kongo-do >> #2, Binsui-do >> #3, Kaisei-do >> #4,
Chunagura-do >> #5, Komanagura-do >> #6, Uchigumori-do 2: Split
Hazuya into a small piece (the tip of the little finger size), and make
it thinner by grinding it with #3, Kaisei-do and #6, Uchigumori-do. After grinding your sword by #6,Uchigumori-do, polish the part of Ha with Hazuya by the finger (thumb) cushion. 3: Split
Jizuya into a small piece (the tip of the little finger size), and make
it thinner by grinding it with #3, Kaisei-do and #6, Uchigumori-do. After grinding your sword by #6, Uchigumori-do, polish the part of Ji with Jizuya by the finger (thumb) cushion. 4: Wrap
Kanahada up in Yoshinogami paper, then lacquer the filtered liquid from
paper to the blade of your sword and polish it with cotton wool etc. Kanahada should be stirred up fully before using. 5: To get Tojiru(liquid), make an oval Hazuya, the same size as 2) and 3), and grind it with #6, Uchigumori-do. Then to make Ha shining and white and to make your Hamon clear, grind the part of Ha with Tojiru by the tip on the thumb. This process is called Hadori. 6: Migaki-bo. This is used to polish Shinogi and Mune. First knead a small quantity of Tsunoko with water, rub it on Shinogi and Mune to remove stains and wipe up the stains. Then polish it with Migaki-bo after making a smooth slide by tapping with Ibota wrapped in a piece of close. 7: Place a piece of paper on Narume-dai on which put down a thinly finished rectangular Hazuya to grind Narume(kissaki).
Omotesuri -to make the surface smooth by small piece of stone:
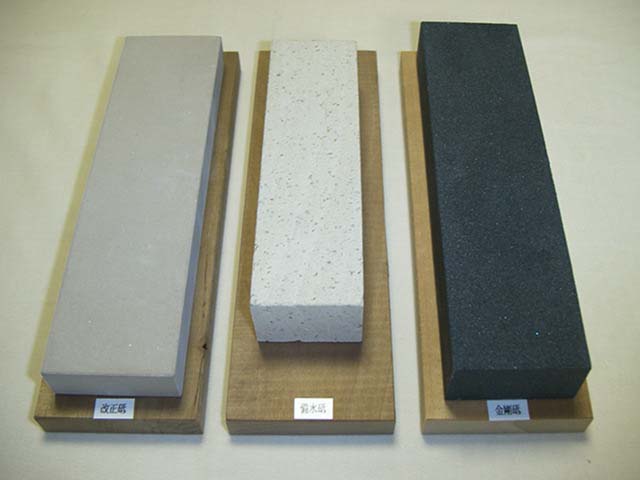
Combination of polishing stones to make a face to face grinding. Nagura >> Uchigumori-do Binsui >> Komanagura-do and Chunagura-do Omura >> Kaisei-do and Binsui-do
These are the same quality as the professionals use, so having this
kit, you are able to enjoy polishing sword at home as if you are a
specialist. It is more reasonable to buy this kit than to buy each item
separately, so get this kit and be fully satisfied with your own
beautiful sword. The stone you receive might be different from the stone shown in the image. Items may not be exactly the same as the one shown in the picture.
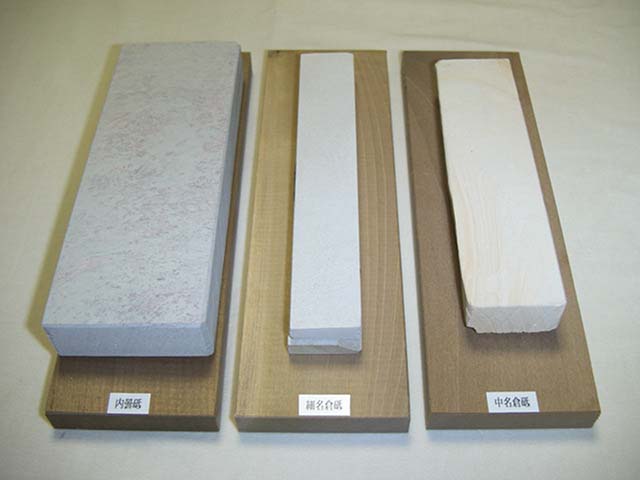
Contents of a set
Uchigumori-do or Suita-do, Koma-nagura-do, Chu-nagura-do
1. Precautions to be taken in handling the Japanese sword
All swords, whether encased in plain wooden scabbards and hilts (shirasaya) or formal mountings (koshirae), need to be kept in their swordbags. The head of the scabbard (kojiri) must go into the bag first to avoid the possibility of an accidental fall.
To carry a sword, the scabbard (saya) must be held with one's right hand. The hilt (tsuka) must be put up and the blade must hang down. This measure will prevent dangerous accidents.
Whenever one draws a mounted sword out of its bag or scabbard, make sure the position of the hilt does not go lower than the scabbard.
The registration card (torokusho) should either be tied to the scabbard or sewed onto the swordbag. The sword owner in Japan has a legal obligation to keep a sword and its registration card together.
2. How to draw a sword out of the scabbard and put it back
Whether drawing out a tachi or katana, one must hold the cutting edge up and grasp the scabbard from underneath in the left hand in forward-holding position. Then, hold the hilt from above with the right hand. Since the scabbard is a rather tight fit at the opening where the collar (habaki) is fit (koiguchi), the initial pull must be very carefully made so that only the collar's length gets drawn out. Giving a sudden powerful pull may not only impair the opening of the scabbard but also might result in an unconfortable jerk leading to injury. Holding the blade still, pull it entirely out of the scabbard very slowly making certain the cutting edge never faces down or sideways.
When a blade is placed back in the scabbard, its case must be held by the left hand and the hilt by the right hand, as in the pulling-out process. The tip of the sharp edge facing up must first rest gently on the opening of the scabbard. Again, holding the blade still, slide the blade along the ditch into the scabbard. When the collar reaches the opening of the case, a firm push is necessary to ensure steady settlement. as before, the cutting edge must not face down or sideways.
3. Method of Maintenace
The major purpose of swordcare is to make sure the steel surface does not oxidize or rust. therefore, it is necessary to thoroughly remove the stale oil and replace it entirely with new oil. The following describes the tools used and the order of operation of swordcare. < A. Tools >
Mekugi-nuki: A tool to remove the bamboo peg (mekugi) holding the blade in the hilt; usually made of brass or bamboo.
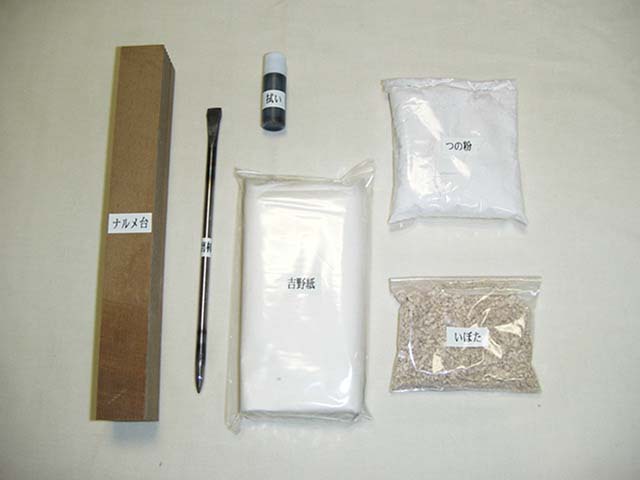
Uchiko: The most finely ground whetstone powder (30-35g) for cleaning the blade surface. First, wrapped in Japanee hand-made paper called Yoshino-gami, then rewrapped by cotton or silk cloth, it comes through the wrapping materials when patted on the blade surface.
Nugui-gami: high quality thick Japanese paper must be thoroughly wrinkled to soften and remove coarse and dusty elements for wiping the blade surface. there are two reasons for the wiping function; one for preliminary removal of old oil and the other for removal of the powder. when using flannel, the fabric must be washed, destarched in water, then dried.
Abura: A rust-preventive oil called choji or clove oil.
Abura-nuguishi: Paper used to spread oil over the blade surface. A piece of wiping paper or flannel will do.
Others: a wooden hammer and benzene, if necessary.
< B. Method of Swordcare >
Lay down the mounted blade and push the peg out in preparation for removing the hilt.
Pull the blade out of the scabbard.
To remove the hilt, hold its end with the left hand on the side where the back of the blade is fit, and keep the blade in a slightly angled uprightb position. Use the right fist to hit the left wrist lightly a few times. when the tang (nakago) becomes slightly loosened in the hilt , repeat until the tang come out of the hilt by the right hand. Be careful not to hit the left wrist too hard with the right hand as there is a danger that blades with short tangs like tanto might bounce out of the hilt entirely. Then, the force of subsequent blows must be adjusted accordingly. When the blade is taken out of the hilt, the peg removed from the hilt should be replaced.
If the blade is mounted in a full koshirae, other attachment such as swordguard (tsuba) and spacers (seppa) on both sides of the swordguard in addition to the collar must be repalced. When the collar is fitted too tightly to remove, it can be loosened by hitting it with a wooden hammer on the back (mune) after covering the collar with a cloth for protection.
The wiping process requires two pieces of paper. The initial one removes the old oil and dust, which is called preliminary cleaning. first, place the cleaning paper on the back and fold it into halves toward the edge. Then, hold the paper-covered blade from above the back so that the thumb and the forefinger grip each side of the cutting section from above the paper. Hardly any force is needed to wipe the blade upward, one way, starting from the base. When the cleaning paper reaches the point, be particularly careful in wiping lightly. No pressure or friction must be put on the point. When expertise is attained, the wiping action can also be both ways, up and down. Lack of experience could cause the cutting of paper or even fingers and thus it must be strictly avoided.
In case the oil cannot be removed with ease, cotton or gauze soaked in benzene or pure alcohol may be used in the same wiping manner as described above.
The powdering starts from the base toward the tip on the obverse in a light, uniform patting motion to cover the blade surface. Then turn the blade over and start patting form the point downward toward the base.
Then, use the other sheet of paper to wipe the powder off the blade surface in the same manner as described in (5) in this section. If oil remains, some more powdering and wiping are necessary.
When the surface is thoroughly clean, check for the presence of rust, flaws and other damages. Then, without putting back the hilt, collar and other attachments, the blade alone must be placed back in the scabbard. It should be noted that the two kinds of wiping paper used in this process must not be interchanged and shold have distinct purposes-preliminary and final.
The re-oiling with a piece of paper, or destarched flannel, folded in size 3cm x 6cm and soaked in fresh oil completes a round of swordcare. When the paper is ready , the sword is to be drawn out of the scabbard again. After placing it in the left hand, put the oiling paper on the back to do the same movement as described in the wiping process. To make sure that blade surface is thoroughly covered with oil, repeat the same procedure a few times. Just as in the wiping, the handling of the sword as well as the oiling paper must be most carefully done. The paper should contain the right amount of oil so that no excess oil will overflow and harm the scabbard. The oil must be spread thinly and evenly.
It is a good idea to apply oil to the surface of the tang with one's fingers. however, an exessive amount of oil must also be avoided here.
Put the collar back and encase the blade tentatively in the scabbard. Remove the peg from the hilt, draw the blade out of the scabbard, hold it in the right hand in an almost upright position, pick up the hilt with the other hand, and put the tang back in the hilt. Keep holding the blade in the hilt lightly with the palm of the right hand so that the tang settles firmly in the hilt. When the tang is fixed in its perfect position, replace the peg. Then, pass the blade to the right hand, pick up the scabbard and slide the blade into it; observing the manner described in Section 2. Needless to say, the other parts like spacers and swordguards of fully mounted swords must also be returned to their respective places before the hilt is put on the tang.
The methods for handling and caring for other forms of blades such as spears (yari) and halberts (naginata) are the same. Spears must be handled especially carefully; otherwise injury may occur. Also, the daggers of double-edged type (ken) are very dangerous. Swordcare tools must be kept perfectly clean, for dust stuck on the wiping cloth or oiling paper could cause scratches on the steel surface. Protecting these surfaces which have been most finely polished through the graded process involving more than ten kinds of whetstones of different fineness and hardness is critical.
4. How to Preserve the Japanese Sword
The most important aspects of preserving blades in any form are to protect them from developing rust and scratches. The precautions required for keeping the Japanese sword in good condition are the following;
Despite regular care and oiling, a blade may develope rust in places. Generally when rusting takes place where the scabbard touches the blade, it must be taken to and repaired by a saya specialist. Or, when the scabbard is very old, its iterior may well be contaminated with rust and dirt, thus causing the steel to rust. In such a case, a new scabbard must replace the old one at once.
Since the formal mounting functions as an outfit for dressing up, a blade needs to have a plain wooden scabbard and hilt which would be, as it were, casual wear for a blade. It is much preferred to rest a blade in its casual outfit so that when the blade surface starts to rust the wooden scabbard can readily be cleaned inside by splitting it open into vertical halves, which are simply fastened together with a paste made from cooked rice. No chemical substances may be used to fasten the parts of the scabbard and hilt.
If a blade should start to rust, no inexperienced repairs such as rubbing the rust off with a spatula of coin's edge would improve the condition; rather it is likely to aggravate it and necessitate extra work in smoothing the damaged area. It must be taken to a polishing specialits at once just like a sick person would need to go to see a medical specialist.
Since a blade is particularly vulnerable to rusting soon after polishing, cleaning and oiling should be done preferably every ten days for about six mounths.
Later when the polished blade surface condition is more stable, clean it regularly, at least every six months.
In preserving swords, it is improper to keep them in a leaning position because it would cause the oil to go down along the blade surface and make a pool at the point. It is necessary to keep then in a dry place, laid down. It would be ideal to keep them in drawers made of paulownia wool. Use of camphor balls or maphthaline to protect the chest from borers should be avoided. it would cause rust on the steel.
Although dry conditions are preferable for swords, the wooden containers or mountings require moisture. Therefore, the place for preserving swords must be very carefully selected.